Dumb the device tree being generated by qemu, see u-boot. docs
qemu-system-arm -machine virt -machine dumpdtb=qemu.dtbDecopmpile a dtb device tree binary
dtc -I dtb qemu.dtbDumb the device tree being generated by qemu, see u-boot. docs
qemu-system-arm -machine virt -machine dumpdtb=qemu.dtbDecopmpile a dtb device tree binary
dtc -I dtb qemu.dtbEDIT: improved release of the demo is using VueJS with Element-Plus now
The following github project might be helpful for you.
https://github.com/frehberg/rust-vue-demo
The project builds a rust tokio/axum web-service binary, integrating a webui frontend based on Vue framework (npm based), and using websockets to push state-changes from web-service to the webui once per second.
The web-service backend is based on Rust Tokio-Axum framework.
The frontend is based on the “progressive” Vue JavaScript framework; npm is used to compile vue component files to static files (HTML/CSS/JavsScript). These files are embedded into the Rust executable. Further rendering is not performed by web-service during runtime. Any costly DOM tree manipulation is off-loaded into the web-browser. The Vue library Element-Plus provides the UI components.
A new Vue project can be set up following step by step the Vue Getting Started document and the the element-plus installation document; the element-plus starter repository provides a state of the art setup using Vue/Element-Plus (Note: using vite-packer instead of vue-packer or webpack).
The web-service has been implemented using Rust, and it will handle the HTTP requests and may return one of the embedded files or serve the websocket connection.
The compact Vue app realizes a dynamic/reactive web frontend, displaying the data being received via websocket from web-service.

At first clone the repository https://github.com/frehberg/rust-vue-demo into a local directory
> git clone https://github.com/frehberg/rust-vue-demoAfter download, the npm project must be initialized at first, downloading the node.js dependencies.
> cd webui; npm installVue code and Rust code will be built together and executed using a single command, combining the cargo and npm build process. Now, invoke cargo to build and run the project. In the top directory invoke
> cargo run
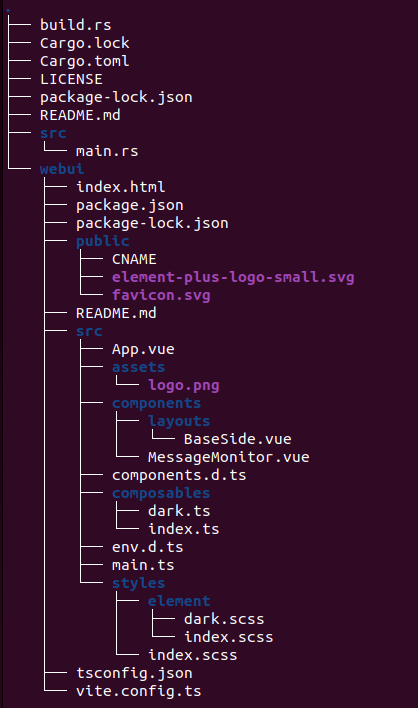
The Vue application (web frontend) is defined by template file webui/src/App.vue, and the Vue component MessageMonitor.vue. The result of the npm-build-process is placed in folder webui/dist/. The Rust backend binary is defined by src/main.rs. The following image shows the complete source tree.
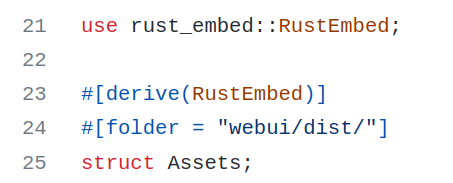
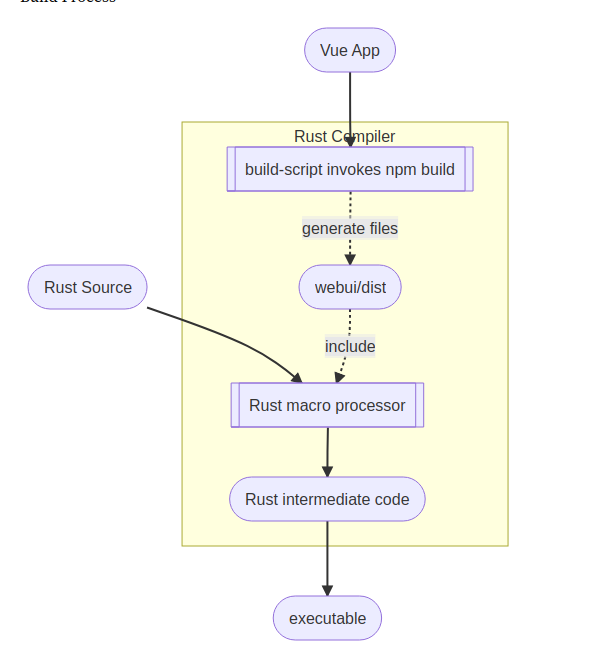
First, the build process will compile the Vue application (see build.rs), producing the files in folder webui/dist. Then the rust_embed macros in src/main.rs will embed the generated files of webui/dist/ and the rust compiler will generate the executable.
The web-service is self contained, the webui assets (Html and JavaScript files, images, etc.) are integrated into the binary.
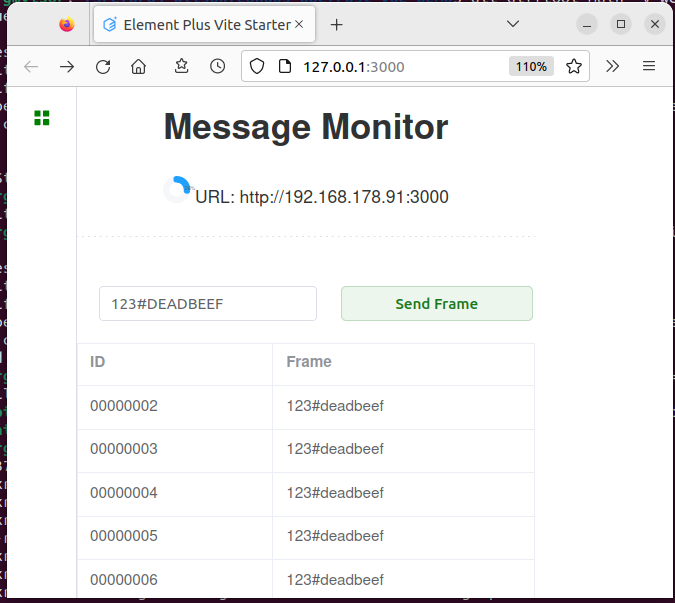
When connecting with web-browser to host at port 3000, eg http://127.0.0.1:3000, the webui will be loaded and it will open a websocket ws://127.0.0.1/ws, receiving data from web-service, suitable for process monitoring. Once per second the service URL is sent to the UI for display.

Via the websocket the UI is able to send CAN frame messages to the web-service and is receiving CAN frames asynchronously. The source code of the reactive UI contains simply 100 lines of code.
This combination of rust-binary and Vue frontend (HTML/CSS/JavaScript) can be used either for backend server systems but is also suitable for embedded systems. The stripped release binary target/release/rust-vue will occupy ca. 4MB, containing the web-service backend, and the webui frontend (HTML/CSS/JavaScript files).
> RUSTFLAGS='-C link-arg=-s' cargo build --releaseThe embedded files are static and sent to webui as is, without any kind of template engine processing; the costly DOM tree manipulation is off-loaded to the web-browser.
I investigated the usage of Verity feature of Linux kernel, ingrating this feature into the OpenCritis environment. The Verity Device Mapper of the Linux kernel is verifying the integrity of a read-only file system (eg partition rootfs) using a Merkle tree; over the data blocks of the file system. If signing the top hash, the authenticity and integrity of the rootfs can be enforced while booting and during runtime!
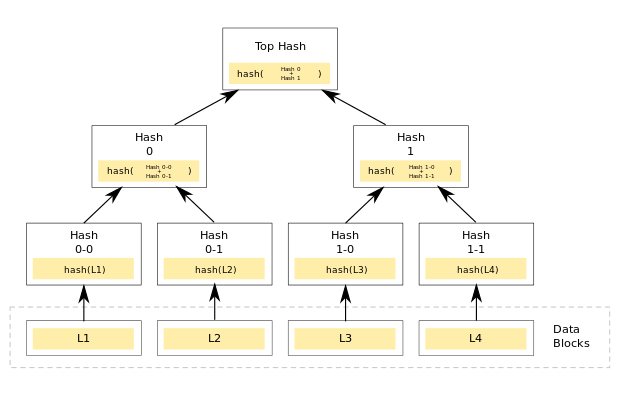
Credits: Nathan Barrett-Morrison did a very good posting explaining the details https://www.timesys.com/security/dm-verity-without-an-initramfs/
Performing secure boot U-Boot, the U-Boot-Env in mmc or flash should be static, read-only. In case of A-B boot concept as being used for OpenCritis, the bootloader needs to know the active partition to boot into. Therefore 3 variables shall be writable only, being stored in U-Boot Environmentn, namely
boot_order: Hex value, either “AB” or “BA”
boot_a_left: Dec value counting the number of trials, by default 3
boot_b_left: Dec value counting the number of trials, by default 3
To acieve this setup the uboot defconfig should have the following setup:
CONFIG_CMD_ENV_CALLBACK=y
CONFIG_CMD_ENV_FLAGS=y
CONFIG_ENV_IS_NOWHERE=y
CONFIG_ENV_IS_IN_MMC=y or CONFIG_ENV_IS_IN_FAT=y
CONFIG_ENV_APPEND=y
CONFIG_ENV_WRITEABLE_LIST=y
CONFIG_ENV_ACCESS_IGNORE_FORCE=y
CONFIG_CMD_NVEDIT_LOAD=y
CONFIG_SYS_CONSOLE_ENV_OVERWRITE=y
In the board header file (eg. include/configs/qemu-arm.h) the following definitions must be added , for example as patch file.
#define CONFIG_ENV_FLAGS_LIST_DEFAULT "boot_order:xw,boot_a_left:dw,boot_b_left:dw"
#define CONFIG_ENV_FLAGS_LIST_STATIC  "boot_order:xw,boot_a_left:dw,boot_b_left:dw"
See the following README explaining the flag attributes: https://github.com/u-boot/u-boot/blob/master/README#L1588
The title of this post might be misleading. IPv6 is not faster than IPv4, but nowadays applications assume IPv6 being the default, having an implication onto the time to establish a connection to a remote host.
Before an application is able to connect to a specific host, first its hostname has got to be resolved via DNS to get to know the corresponding remote IP address.
By default the resolver tries to resolve the corresponding IPv6 address first. If this does not succeed within specific timeout, the resolver is falling back to IPv4.
Thus, if you want to speed up the connection times of your applications, make sure both, your local network and also your internet provider, are supporting IPv6.
If your internet provider does not support native IPv6, it might be better to disable IPv6 in your local network as well, to prevent your local applications from using IPv6 at all.
Do not contract an internet provider for your home area network without IPv6 support!
From the other side of the table, in case you are providing an internet service, your customers might try to connect to your IPv6 service endpoint first, just falling back to IPv4 later. So, your IPv6 endpoint will provide a better usability for your customers.